Deploy a Django application with Hetzner and Dokku
dokkuweb developmentdevopsdjangohetznerIn previous posts I talked about Dokku, a self-hosted Platform as a Service (PAAS) solution that you can run on Hetzner.
This is a great solution for a single developer, when you want to launch a hobby side project or small business and you don't have a big budget. Here I go through the steps to launching your own micro-PAAS in under 30 minutes!
Prep #
For our example, we are going to deploy a Django application, simpleapp. We are going to host our site on the domain simpleapp.com.
To make this project "Dokku-aware" you should have at least an app.json and a Procfile. For a bare minimum example our app.json file looks like this:
  {
      "name": "My little SAAS",
      "formation": {
          "web": {
              "quantity": 1
          }
      },
  }
and the Procfile:
  release: ./release.sh
  web: gunicorn -c ./gunicorn.conf.py
If you have used Heroku, the Procfile should be familiar.
The release process, which is triggered on each deployment, points to a release.sh file that runs migrations, does some system checks etc:
  #!/usr/bin/env bash

  set -o errexit

  ./manage.py check --deploy

  ./manage.py migrate

  ./manage.py clear_cache
I like to point gunicorn at a Python module:
  import multiprocessing

  # https://docs.gunicorn.org/en/stable/configure.html#configuration-file

  wsgi_app = "project.wsgi"

  accesslog = "-"

  workers = multiprocessing.cpu_count() * 2 + 1
The neat thing about using a Python module instead of a config file or command line options is that you can calculate some things dynamically, e.g. the number of workers based on available CPU.
You can add more processes to your app.json and/or Procfile as needed, for example if you want to run Celery, or schedule cron jobs. See the Dokku documentation for details.
I prefer to handle Dokku deployments using Docker rather than buildpacks. For details on building an optimal Dockerfile for Dokku deployments, see my previous article.
Create a Hetzner project #
Build your project #
Once you have registered with Hetzner you can start a new project.

The requirements depend on your project. For a typical Django-based application I go with the CPX11 or CX21 options:
- Ubuntu (22.04 as of writing)
- x86
- 2xCPU
- 4GB RAM
- 40GB SSD
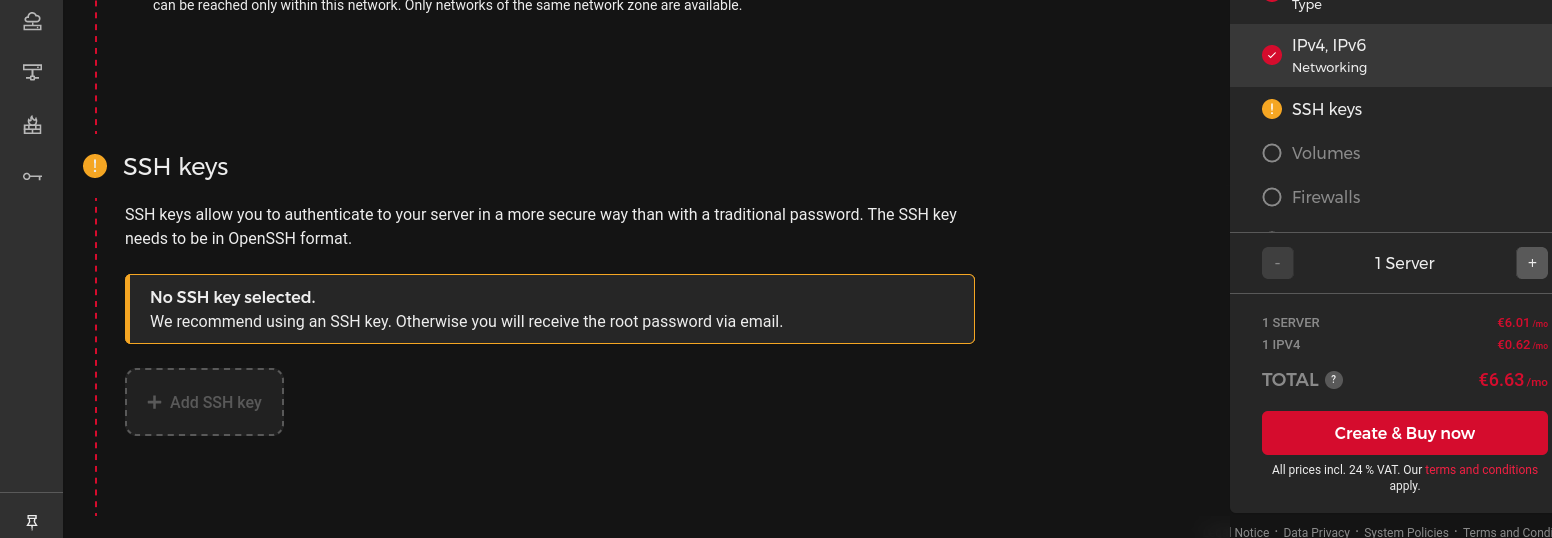
This should cost around 5-6 EUR a month. You can scale up to more memory/CPU if needed or purchase a volume if you need a much larger disk space (or just go with S3). You can also, for a little extra, make snapshots or add automated backups. Consult the Hetzner documentation for more information on this - for now we just want to get our site up and running.
Make sure to add your SSH key at this stage.
Configure firewalls #
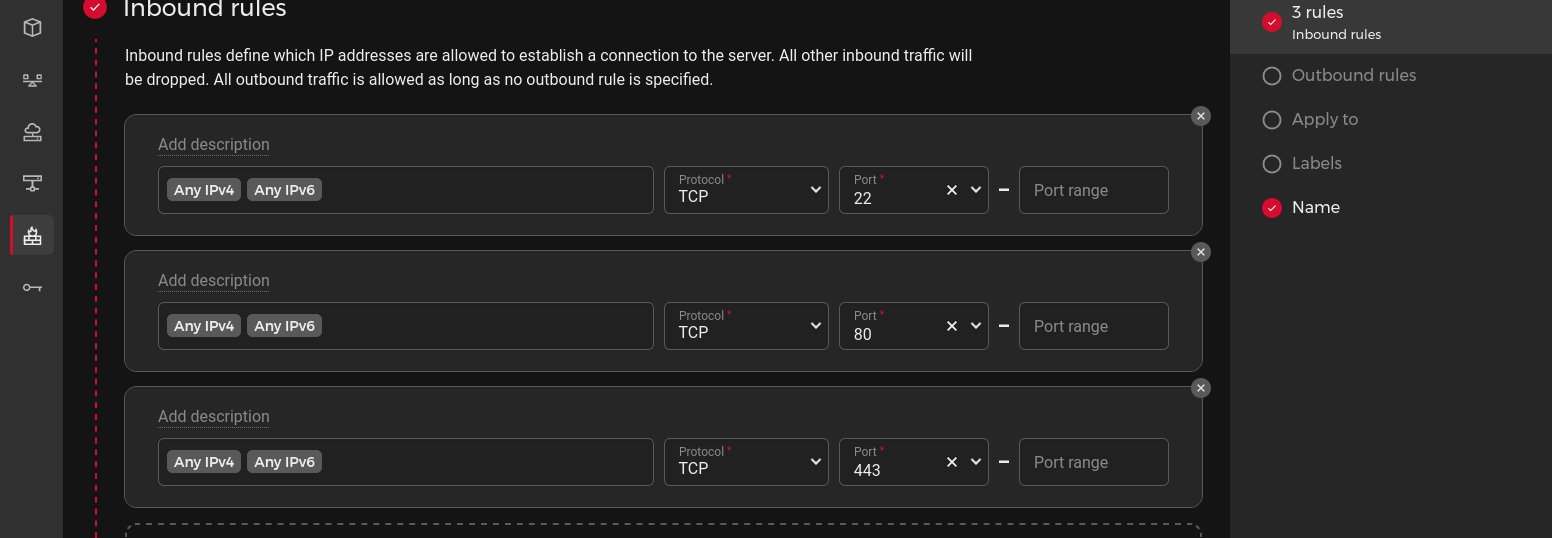
You will need these firewalls:
Inbound #
- SSH (Port 22)
- TCP (Port 80)
- TCP (Port 443)
Outbound #
- TCP (Port 80)
- TCP (Port 443)
You can reuse this firewall configuration with multiple projects.
Set up DNS #
Next step is to set up DNS with Hetzner and map this to your domain registrar. I usually go with Namecheap but any provider should work fine as long as you can point your domain at the Hetzner nameservers.
The Hetzner DNS dashboard can be found at https://dns.hetzner.com/.
You will need to add at least one A record with the IP address of your project (shown in your project dashboard).
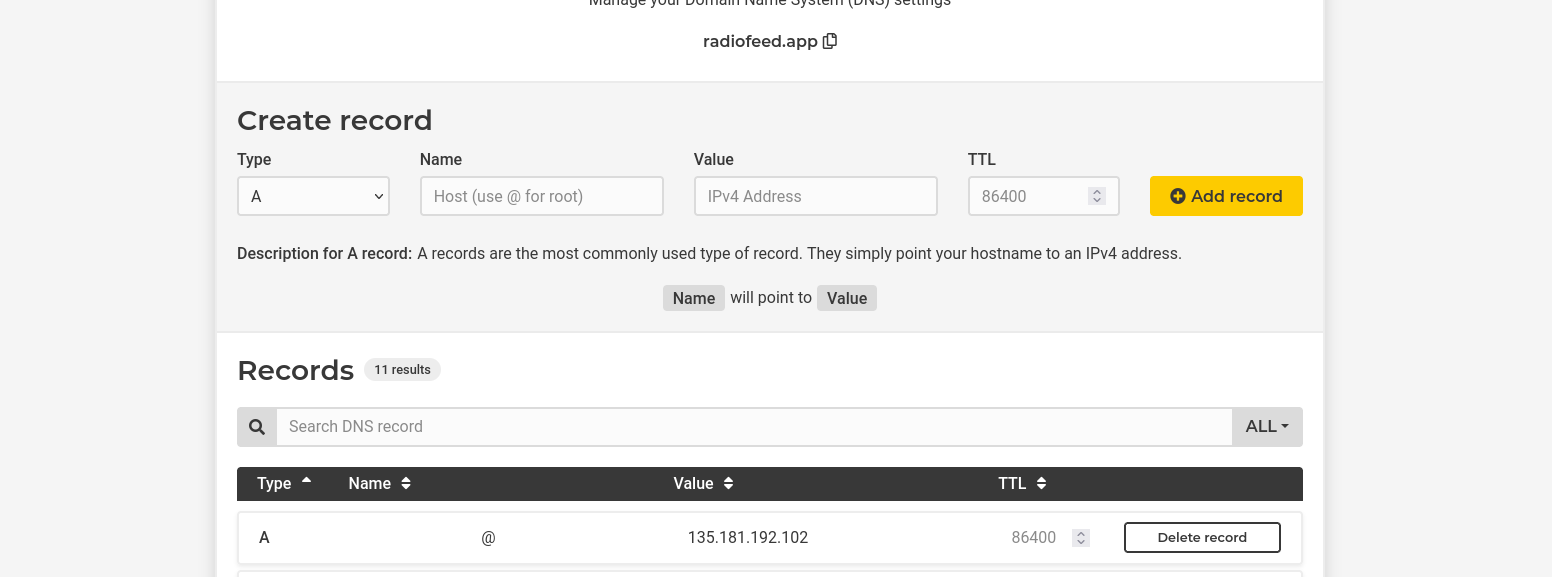
There should also be three NS (Nameserver) records included by default, these should be something like:
In your domain registrar (Namecheap in my case) you should have the option to set custom DNS. Add those three nameserver records.

Note that you can use the Hetzner DNS service for other needs, e.g. setting up email domains with Mailgun or some other service.
At this point, once the DNS changes have propagated, you should be able to SSH into your new server (you should have your SSH key added to the project as noted earlier):
ssh [email protected]Now you are in the server, you can install Dokku.
Set up Dokku #
Install Dokku #
Once you are able to ssh into the server, you can install Dokku. This is just a couple commands:
  wget -NP . https://dokku.com/install/v0.32.3/bootstrap.sh
  sudo DOKKU_TAG=v0.32.3 bash bootstrap.sh
Check the correct stable version from the Dokku site: as of writing this is v0.32.3.
Installation will take a little while. It will not only install the Dokku runtime itself, but also add a dokku user and group.
Once installation is complete, you should add your SSH key to Dokku:
cat ~/.ssh/authorized_keys | dokku ssh-keys:add adminWhen you added your SSH key to the Hetzner project, it should have been added to the authorized_keys file.
This allows you to run Dokku commands remotely from your local terminal and deploy your repo, more of which later.
If you want to use some other SSH key you can do so with dokku ssh-keys:add admin, for example if you want to allow other developers to be able to access Dokku.
Install plugins #
Dokku has a number of plugins (and can even use some Heroku buildpacks). My typical Django project just needs three: PostgreSQL, Redis and LetsEncrypt. While still logged into the server, you can install these now:
  dokku plugin:install https://github.com/dokku/dokku-postgres.git
  dokku plugin:install https://github.com/dokku/dokku-redis.git
  dokku plugin:install https://github.com/dokku/dokku-letsencrypt.git
Once the plugins are installed, you can log out of the server. We will do the rest of the setup in your local terminal.
Create your Dokku app #
The next step is to create your Dokku app. For convenience, this should be the name of your repo, so in our case simpleapp.
ssh [email protected] apps:create simpleappNote a couple things:
- We are running a Dokku command using the
dokkuuser, notroot. - When running remote commands under the
dokkuuser, we don't need to adddokkubefore each command.
The command apps:create will create our app, but currently of course there is nothing there to run. Dokku might complain about this while running commands, but ignore it for now.
Set up PostgreSQL #
Next we need to create a PostgreSQL database and link it to our app.
  ssh [email protected] postgres:create simpleapp
  ssh [email protected] postgres:link simpleapp simpleapp
This will automatically create a runtime environment variable DATABASE_URL. In your Django settings, you should therefore ensure that in production your database accesses this value from the environment. Parsing this into the USER, NAME and other db settings can be a pain, so using dj_database_url is recommended:
  import dj_database_url

  DATABASES['default'] = dj_database_url.config(
      conn_max_age=600,
      conn_health_checks=True,
  )
dj_database_url.config assumes the default DATABASE_URL environment variable.
Set up Redis #
If your project is using Redis, for example for caching or as a Celery backend, the process is similar to PostgreSQL - create a database, then link it to your project:
  ssh [email protected] redis:create simpleapp
  ssh [email protected] redis:link simpleapp simpleapp
Again, an environment variable REDIS_URL is automatically generated, which should be accessed in your production settings:
  import os
  REDIS_URL = os.environ["REDIS_URL"]
Set up LetsEncrypt #
In order to set up LetsEncrypt to provide SSL protection for your site, you first need to configure your domain with Dokku. By default a domain is created when you created the app, this will be something like ubuntu-hel1.simpleapp.com. Clear any default domains with this command:
ssh [email protected] domains:clear simpleappYou can now link the domain you want to use with your app:
ssh [email protected] domains:add simpleapp simpleapp.comNow you can setup LetsEncrypt. First add your email address:
ssh [email protected] letsencrypt:set simpleapp email [email protected]Next enable Letsencrypt:
ssh [email protected] letsencrypt:enable simpleappThis will automatically handle nginx configuration. If you want to set up auto-renewal:
ssh [email protected] letsencrypt:auto-renew simpleappDeploy your code #
Push your code to Dokku #
Go to the top level of your repo in your local terminal. Once you have commmitted any changes you can now push to deploy:
  git checkout main
  git remote add dokku [email protected]:simpleapp
  git push dokku main
Note the remote location - it should be dokku@DOMAIN:APP_NAME. This is the app you set up earlier with apps:create.
If all goes well, your site should be deployed. If you are deploying with a Docker image, Dokku will build your image and deploy the container.
This process should be familiar to users of Heroku and other PAAS: to push any subsequent code changes to production, you just need to do:
git push dokku mainSet environment variables #
Next you will probably want to set some environment variables. As noted, some environment variables such as DATABASE_URL are set automatically so we should not touch those. Others you might want to set are:
SECRET_KEYALLOWED_HOSTSe.g. simpleapp.com.- 3rd party credentials e.g. Sentry or Mailgun
To set a environment variable for example SECRET_KEY:
ssh [email protected] config:set --no-restart simpleapp SECRET_KEY=my_top_secret_keyThe --no-restart flag will set the key without restarting the server: you might want to do this if setting a bunch of keys at the start. The environment variable will not take effect until you restart.
Once you are done you can restart the server without needing to deploy again with this command:
ssh [email protected] ps:restart simpleappFinishing up #
Create a superuser #
Finally you may wish to add a superuser to access the Django admin. In Dokku there is run command which allows you to execute arbitrary commands within the running container:
ssh -t [email protected] -- run simpleapp ./manage.py createsuperuserNote the -t flag: we need to run this command with tty as it is interactive (Django will query you for username, email etc). You should use this syntax for any interactive commands, for example if you want to run the Python or Django shell.